

Focus Stacking - Getting Your Photos SHARP
Focus stacking is a way you can get your photos sharp from front to back with very little effort, in fact, once you learn this skill, it will stay with you throughout your whole photographic journey!
Focus stacking is a process where you focus on different parts of your photograph and then when editing, you get your computer to stitch the different parts of the photograph together, to create one final image where everything is in focus … and whether you are a beginner or a pro, you can learn this technique to really boost the look of your photographs.
Sometimes, when you take a photograph, you might get home and when editing your photos, you notice that part of your photograph is a little bit blurry. A lot of times, this can be the foreground when you focus on the background. If this is the case, this is really a technique you need to learn, and is not that hard at all.
If you want to see a video on this process, click on the video link, but if you prefer to read about it, well … just keep reading.
This is a technique that comes in two parts, part one is getting the images out in the field and the second part is editing them together.
You can either let the computer choose which parts of the image it wants to put together, or you can do it manually. I am going to show you both ways.
Taking The Photographs for Focus Stacking
When you are out taking photographs, there is a time and a place when you should focus stack and a time and a place where you don’t need to focus stack.
If everything is really far away from you in your frame, chances are you won’t have to focus stack.
These next examples are all photos where I didn’t have to focus stack, and with some of them, I am using a really wide aperture, between f5.6 and F2 … because the elements in the photos were so far away, everything is in focus in one shot.

Bromo, Easter Java, Indonesia

Dolomites at 500mm

Breadon Hill from the Malverns - Sunrise

No focus stacking needed

Everything is really far away so no need to focus stack
So you can see there are many times where you don’t need this, however, there are other times that you really do, and if you know how to get the images, you will get much better photographs.
When you have something in your frame that is really close, together with something that is really far away, this is when you might need to focus stack.
If I am not sure, I will take a photograph of a scene where I focus on the background. Then I’ll have a look at it with the magnify tool. If the foreground is a little blurry, this is when I do focus stack.
It is better to get too many photographs, instead of not enough.
Photography has become more of a data gathering exercise these days … and if you gather good data, you can get an amazing photograph.

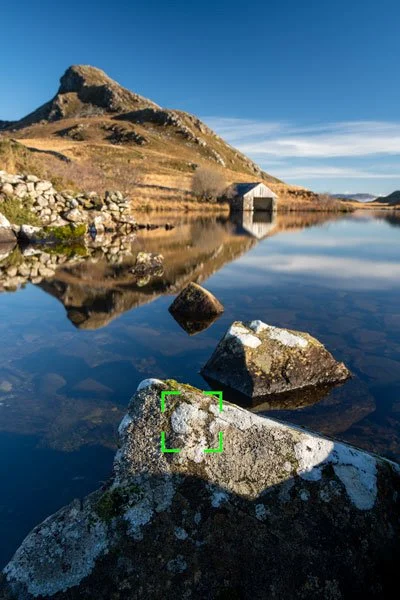
In this case, you can see the foreground is really close and the mountain is really far away.
In the example above, I took a photograph, focussing on the mountain and then looked back at it … the foreground is out of focus so this tells me I need to focus stack. See the image below to see for yourself.

Blurry foreground - Needs focus stacking
First of all, you need to shoot from a tripod, this will ensure that you keep the same framing throughout the sequence. If you move the camera too much, your computer will not stack the images successfully so in keeping it on a tripod, this will help you keep it still, although it is quite easy to kick your tripod and mess up the whole sequence … if you do this, just reframe your shot, and start the sequence again.
Also, shoot in manual mode, this will make sure the settings don’t change between shots, making it easier to stack them together. When the exposure does not change in the semi automatic modes, it can be annoying when you have to correct for this when editing …
So with my camera on my tripod, I took a photograph focussing on the mountain, then one focussing on the wall to the left, and then one focussing on the foreground.


I edit my photos in lightroom, but when it comes to focus stacking, I send them across to photoshop. Photoshop is such a powerful program and if it seems intimidating, it really doesn’t have to be. Just approach it in small steps, doing one task at a time.
Stacking Your Photos together
I use lightroom and photoshop to stack my photos, but you can use a dedicated program like Helicon Pro … it is all up to you. I just like how the Adobe programs work really well together and you can transfer images back and forth between programs really easily.
First of all, import your images into lightroom and then find the ones you have in your sequence.
Select all of your photos in the focus stack
One you have found the images in your stack, select them all by clicking on the first one, holding shift and clicking on the last one, this should select them all, turning them a lighter colour along the film strip on the bottom of the lightroom panel.

Open as layers in photoshop
Right click on the selected images and then go to “edit in” and then select “Open as layers in photoshop”.

Wait for all of the layers to load.
Wait for the layers to load … this might take awhile if you have an old computer or a slow processor.

Rename the layers
You don’t have to do this, but I like to rename the layers so I know which one is which. I click on each layer and see where I have focussed by zooming in on each of the layers.
If you just want to view one of the lower layers, click on the eye icon in the layers panel to make it disappear … and then click on the eye icon again to make it reappear.

Select all layers and then edit, auto align layers
Next, select all the layers by clicking on the top one, holding down shift and clicking on the bottom one, they should all turn grey like in the image above.
Once you have them all selected, click “edit”, and then “auto-align layers”.

Keep this panel on auto and click ok
Keep this panel on auto and then click ok. This may take a while, but wait for it to finish processing and aligning the layers.
This gets rid of any small movements you might have made when changing the focussing points and also that might have occured due to focus breathing.

Edit, Auto Blend layers
Next, auto-blend layers, by selecting all layers (they might already be selected from the last step), and then clicking “edit” and then “auto-blend layers”.

Auto Blend layers panel
Make sure “Stack Images” is selected and then click “ok”.

Processing
Let photoshop do its thing, it will go through a few steps before giving you the blended image.

Masks added
Photoshop will add masks to each layer hiding or showing different parts to each payer depending on what it thinks it should show.
Sometimes it works but other times it doesn’t get it right …

Save photo in photoshop
Save your photo and then once that is done, it should open the new image in lightroom.

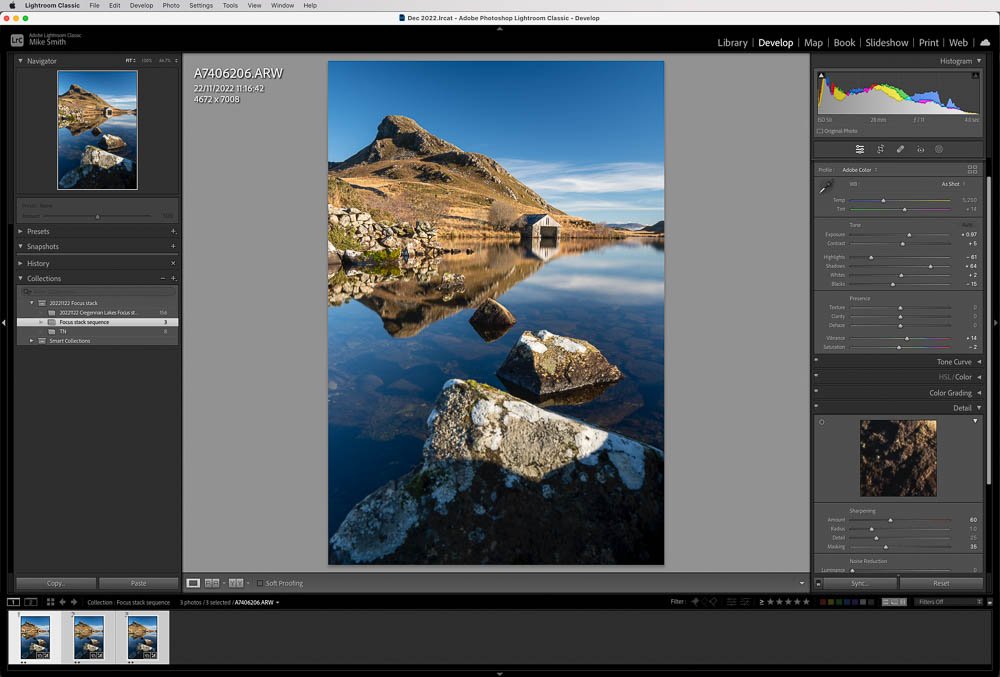
Stacked photo in lightroom
Once your stacked photo is in lightroom, you will have to crop it as there might be white bits along the edges where it re-aligned the layers. I do this with the crop tool in lightroom.

Edit as normal … presets available in my shop!
I then edit the photo as normal either using one of my presets or by working my way through the sliders on the right hand side.
Focus stacking sounds complicated but with the editing programs we have available these days, it is really straight forward.

Stacked and edited using my “Creamy Crisp” Preset
All you need to do is get the right number of photos that are focussed in the different places throughout the frame, and then when you get back home, do the above steps and you will end up with a successful focus stacked photograph.
Now if you want to see how to do it manually, I will be writing that article next week, but if you want to learn it now, clikc on the video link at the top fo this page … and if you want to buy my preset pack, click here.
Thanks
Mike